
Disassembling a Peloton Bike for relocation requires careful planning and proper technique. Many cyclists find this task intimidating, but breaking it down into manageable steps makes the process much simpler. Working with a leading moving company can provide professional assistance, but tackling it yourself is entirely possible with the right approach. From removing pedals to separating the frame, each stage plays a crucial role in safely taking apart your bike. This guide walks you through the complete disassembly process, including an often-overlooked detail that can save you significant time and frustration during reassembly.
Tools Needed for Disassembly
To efficiently disassemble a Peloton Bike, you’ll need several common tools found in most household toolkits. Start with a 6mm Allen wrench for removing the pedals. You’ll also need a 15mm wrench to loosen bolts on the seat post and handlebars. Keep pliers handy for removing zip ties securing cables. A socket wrench with a 19mm socket helps detach the stabilizer bolts. For the frame, use a 5mm Allen wrench to disconnect the monitor and a 4mm Allen wrench for the water bottle holder. A rubber mallet might help with stubborn parts. Having these tools organized before starting makes the disassembly process much smoother.
Removing the Bike Pedals
When taking apart a Peloton Bike, start by removing the pedals using a 6mm Allen wrench. Place the wrench on the pedal spindle and turn counterclockwise to loosen the right pedal. Remember that the left pedal has reverse threading, so you’ll need to turn it clockwise instead. Once both pedals are loose, carefully unscrew them completely from the crank arms. Pay attention to any washers or spacers that might come off with the pedals and store them in a labeled bag. This methodical approach ensures you’ll remove the bike pedals without damaging the threads or components.
Detaching the Handlebars and Screen
Begin by unplugging all cables connecting the handlebars and screen to the main bike frame. Locate where these cables connect to the frame and disconnect them gently. Take photos or notes about which cable connects to which port for easier reassembly later. Next, loosen the bolts securing the handlebars to the frame. These are typically located underneath the handlebars or on the sides, depending on your Peloton model. After loosening, carefully lift the handlebars from their position. For the screen, disconnect any additional cables and unscrew the mounting bolts. Gently remove the screen and wrap it in protective material for safe transport.
Taking Apart the Seat and Seat Post
After handling the handlebars and screen, focus on removing the seat and seat post. Follow these practical steps:
- Find the seat adjustment lever underneath the seat.
- Pull the lever to release the seat from its post.
- Unscrew the seat post knob at the base of the post.
- Carefully pull the seat post straight up out of the bike frame.
- Wrap the seat and post separately in protective material for transport.
This systematic approach ensures both components remain undamaged during the move and ready for quick reassembly at your destination.
Separating the Bike Frame and Base
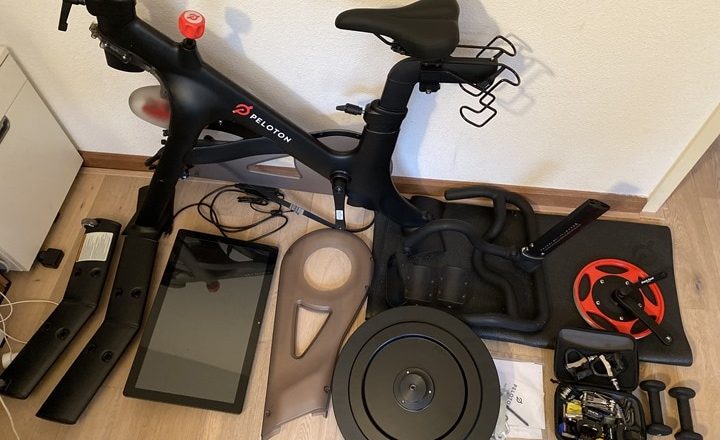
To separate the bike frame and base, first identify all connection points between these components. You’ll typically find screws or bolts securing the frame to the base near the flywheel and resistance knob. Using your wrench or screwdriver, carefully loosen and remove these fasteners. Store all hardware in a labeled bag to prevent loss. Once all connections are free, gently lift the frame away from the base. This step often requires a second person to help manage the weight and avoid damaging any remaining connections. With the frame successfully separated, your Peloton bike is now properly disassembled and ready for safe transport to your new location.
Other Related Articles: